
Reviewed 2026-10-21
How to Preserve Wedding Bouquet Flowers: 4 Methods
By Samudra · Updated
Short answer
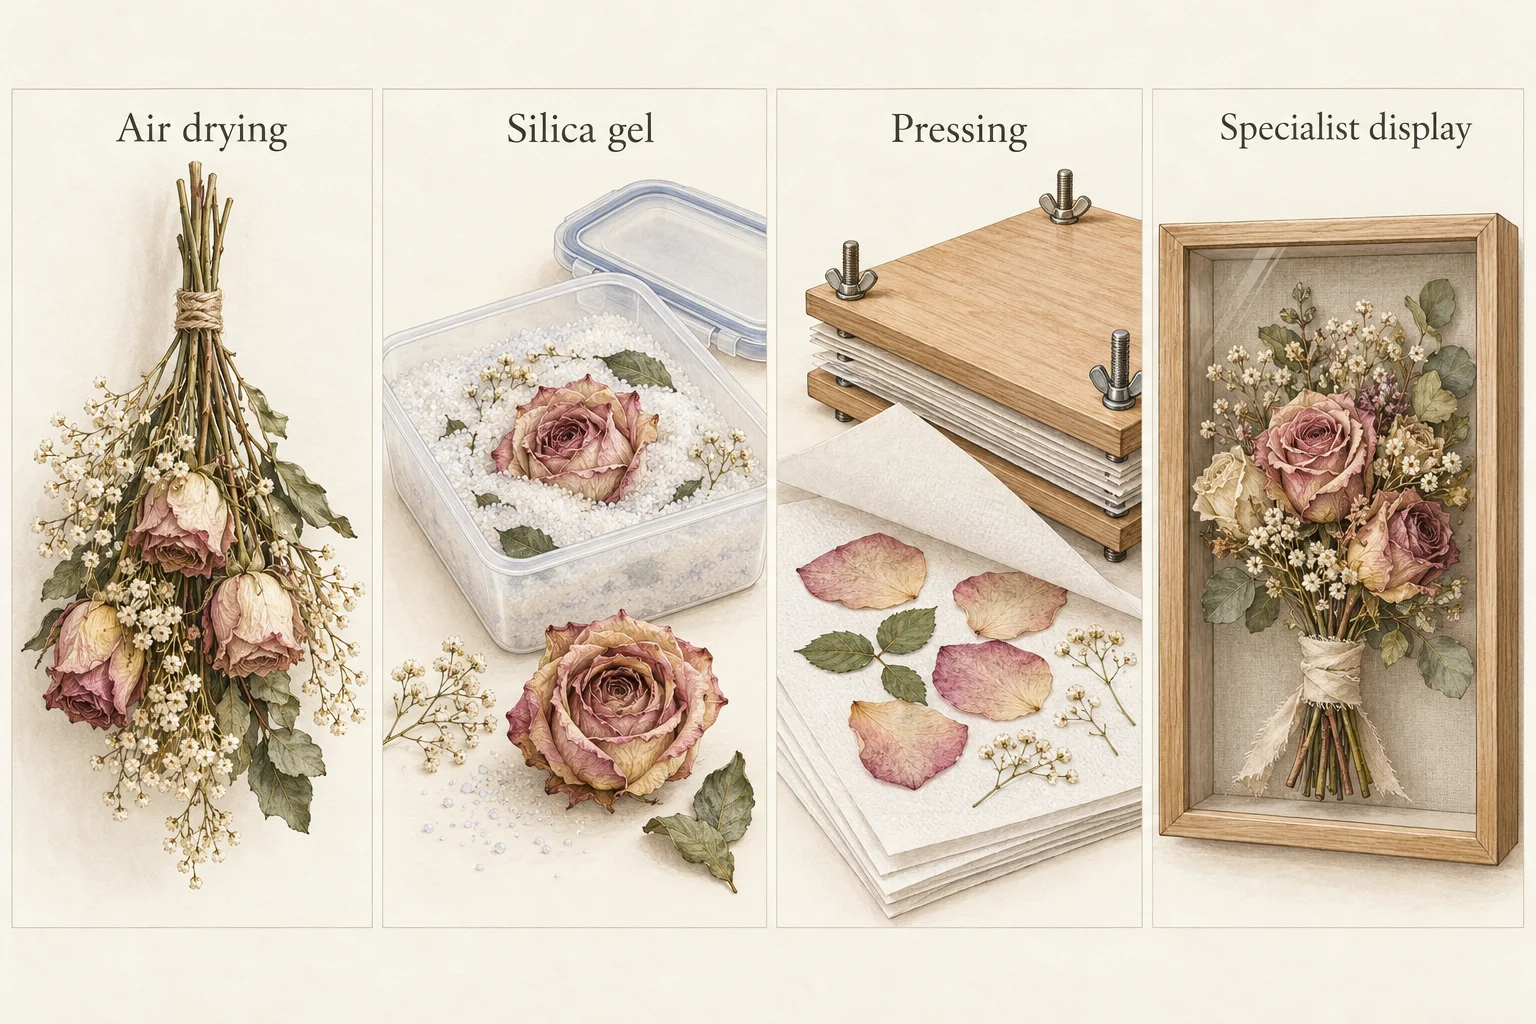
Here's how to preserve wedding bouquet flowers: keep them cool and their cut stems hydrated after the wedding, then start preservation before the blooms deteriorate. Air drying gives you a dried bouquet, silica gel supports individual flowers in three dimensions, and pressing makes flat flowers for frames. Choose a specialist for delicate flowers or a finished display you do not want to make yourself. Photograph the bouquet first, then use the comparison below to choose your method.
Best ways to preserve a wedding bouquet
| Method | Best for | Supplies | Approximate time | Expected appearance | Difficulty | Important limitation |
|---|---|---|---|---|---|---|
| Air drying | A natural dried bouquet or loose stems. | Clean scissors, rubber bands or ties, a hanging point and dry ventilated space. | Usually 2–3 weeks; dense flowers and damp conditions may take longer. | Smaller, papery blooms with muted or darker colors. | Low; needs a suitable space. | Unsupported petals can curl or collapse; a dense bouquet may dry unevenly. |
| Silica gel drying | Selected dimensional blooms for a case or shadow box. | Flower-drying silica, airtight tub, spoon, scissors and soft brush; protection specified by the product. | Often 2–7 days with ACTÍVA's conventional method; follow your product and flower guidance. | More of the bloom's shape retained, with possible color shifts. | Moderate; careful covering and removal. | Fragile petals can break, and thick centers can remain damp. |
| Flower pressing | Flat framed art, petals and small leaves. | Absorbent plain paper, cardboard and a flower press or heavy flat books. | About 1–3 weeks for suitable thin material; check dryness rather than a calendar alone. | Flat silhouettes and petal arrangements. | Low to moderate; material choice matters. | Whole thick blooms may trap moisture; the original bouquet shape is lost. |
| Professional preservation | Specialist drying, pressing, freeze-drying or a finished keepsake. | A reservation and the studio's specified delivery or shipping materials. | A studio-specific schedule, often measured in months for a finished piece; request a written estimate. | Varies from flat floral art to dimensional displays or resin pieces. | Specialist work; you manage prompt handoff. | Cost, delivery risk, natural changes and unsalvageable flowers still apply. |
These are drying or completion estimates, not promises. Flower condition, thickness, room humidity and technique change the result. The RHS describes air drying and pressing; ACTÍVA gives a 2–7-day conventional silica method. Your own product's instructions take priority over a general range.
What to do with your bouquet immediately after the wedding
Give one person the bouquet and a specific job: take it home safely, care for it and either start your chosen method or deliver it to the preservation service. Make that arrangement before leaving for a honeymoon. Supplies in a cupboard do not help if nobody knows where the flowers are.
- Photograph it before dismantling. Take a front view, side view and detail of the ribbon. These become a reference for reassembly and a record of colors that may change.
- Keep it cool and out of sunlight. Move it away from radiators, candles and a hot vehicle. Carry it upright and protect the heads from bags or boxes pressing against them.
- Hydrate cut stems appropriately. For a hand-tied bouquet, use a clean vase with fresh water, keeping foliage below the waterline removed and ribbons and flower heads above the water. Follow the florist's instructions for foam holders, wired flowers or unusual blooms.
- Remove deterioration. Set aside bruised petals and remove rotting or moldy material. Do not mix it into the drying batch.
- Choose the part you can preserve well. A few healthy flowers and the original ribbon can make a better keepsake than a whole arrangement that is already failing.
- Start preparation while the flowers are sound. Do not wait for them to look dry in the vase. If a specialist will handle them, ask before undoing its preferred arrangement or cutting stems.
The RHS cut-flower care guidance supports clean water, removal of submerged leaves and a cool position. That temporary care buys preparation time; it is not preservation itself. Before pressing or using silica, the petals should have no visible surface water. Do not wet the blooms as a preservation trick.
Method 1: How to air-dry a wedding bouquet
Choose air drying if you like the look of dried flowers and want to retain stems for a bouquet. Baby's breath, statice and other papery material are useful candidates. Large hydrangea or peony heads need individual space. Expect shrinkage and a softer, sometimes brownish palette rather than fresh-flower perfection.
Gather: scissors, small rubber bands or soft ties, hooks or a rail, and a dry area with gentle air circulation and little light. A damp bathroom, tightly packed cupboard or sunny windowsill is unsuitable. Keep the drying area away from heaters and flames.
- Unwrap carefully. Photograph the arrangement, remove pins, untie the ribbon and put decorative pieces somewhere dry. Separate the stems without pulling through the flower heads.
- Prepare sound stems. Remove excess leaves and damaged material. Divide a large arrangement into small, loose groups, keeping bulky heads separate.
- Tie without crushing. Wrap a rubber band around the lower stems, then attach the hanging tie. Check that the bunch stays secure as the stems shrink.
- Hang upside down. Leave space around each bunch so petals do not press into a wall or neighboring flowers. Hang large heads individually.
- Inspect without constant handling. Look for damp spots, musty smells or mold. Remove affected material and improve the location if the air is damp or stagnant.
- Check completion. Suitable flowers often need about two to three weeks. Look for dry, papery petals and dry stems and bases, not just a crisp outside layer. Continue drying if thick parts remain soft or moist.
- Reassemble gently. Support flowers by their stems, arrange them without squeezing the heads and add the saved ribbon. Put the bouquet in a dry vase or a sufficiently deep protective case.
The Illinois Extension flower-preservation guide identifies hydrangea, baby's breath and statice among suitable air-drying choices. A mixed bridal bouquet may contain other flowers that need a different method, so do not keep the arrangement intact at the expense of proper drying.
If your dried wedding bouquet looks uneven
Different flowers can finish at different times. Keep unfinished stems separate and assemble only once each is dry. If outer petals curl, accept that as part of this method rather than wetting and reshaping your keepsake. If a head is collapsing before drying, save healthy petals for a flat arrangement or ask a specialist to assess it. Hairspray is not a substitute for removing moisture.
Method 2: How to preserve wedding bouquet flowers with silica gel
Silica gel draws moisture from flowers while the surrounding granules support their shape. It is a useful choice for individual roses and peonies when you want depth in a shadow box. Buy a product intended for flower drying; little packets from deliveries are not a practical substitute for enough fine material to support a bloom.
Gather: flower-drying silica, a clean dry airtight container deep enough for the chosen heads, scissors, a spoon, labels and a soft artist's brush. Read the product's instructions and safety information before opening it. Avoid breathing dust: pour gently in a ventilated workspace, keep your face away from the container, and use the protective equipment the product specifies. Keep supplies away from food, children and pets.
- Select individual blooms. Use flowers in good condition with no surface moisture. Trim stems to fit the container, leaving enough to handle the flower. Save intact stems separately only if your display will need them.
- Lay a supporting base. Add the depth of silica specified by your product. Make sure the container has room for material beneath, around and above the flowers.
- Position without crowding. Place rose-like heads face up, allowing space between them and the sides. Follow product guidance if a flower needs another orientation.
- Support and cover gradually. Spoon granules around the base and between petals carefully, then over the top. Do not dump a heavy mound onto the head. Fully cover the flowers while preserving their natural position.
- Close and label. Seal the airtight lid. Record the flower, start date and the earliest check recommended by the manufacturer. Keep the container undisturbed in a dry place.
- Check the bloom, not just the calendar. At the advised time, gently uncover enough to assess it. Petals should be dry, with no soft damp center or base. If incomplete, carefully recover it and continue according to the product guidance.
- Remove with support. Spoon away loose material before lifting by the short stem or supporting the base. Use a soft brush for remaining grains. Do not tug a flower through the silica or rinse it afterward.
University of Florida Extension explains why silica needs an airtight container and why thick parts dry last. Dryness and color are separate questions: a flower can be fully dry yet darker or more cream-colored than it was. Over-dried petals may be very brittle, so leaving flowers buried indefinitely is not an improvement.
What can go wrong with silica drying?
If petals flatten during filling, stop and adjust the support before burying the flower further. If used silica is already moisture-saturated, follow its reactivation instructions or replace it. An indicator color describes the drying agent's condition, not a guarantee that every flower center is dry. Keep different flower types in separately labeled containers if their recommended times differ.
This method uses room-temperature drying. Do not improvise microwave settings, heat a sealed tub or transfer instructions between products. Your wedding bouquet is a poor first experiment with a heated drying technique. Once dry, put the blooms in their planned display promptly and handle them as little as possible.
Method 3: How to press wedding bouquet flowers
Pressing turns flowers into flat artwork. Start with small, naturally flat flowers, individual petals and thin leaves. A thick rose or peony squeezed whole between books can retain moisture in its center; preserving a selection of its petals is a more manageable beginner project.
Gather: clean, plain absorbent paper or blotting paper, corrugated cardboard, a flower press or heavy flat books, a dry workspace and tweezers for the finished pieces. Avoid glossy or waxed sheets as the absorbent layer. Protect valued books from flower moisture and staining.
- Choose the view. Set each flower face up or in profile before pressing. Arrange petals the way you want them to lie; they will not be flexible once dry.
- Reduce thick material. Remove bulky stems. For a densely layered bloom, separate sound petals and keep them grouped under a label. If you want an intact reconstruction of a complex flower, use a specialist instead of forcing it flat.
- Build one layer. Put flowers between sheets of absorbent paper with space around each piece. Do not overlap petals. Sandwich the paper between cardboard or the press's supplied layers.
- Apply even pressure. Tighten a flower press evenly, or place the protected stack beneath a stable pile of heavy books. Keep it flat in a dry place where it will not be disturbed.
- Manage moisture. Check the paper early and replace it if damp. Support the flower on its sheet while changing surrounding layers, and do not peel a sticking petal forcefully. Reapply pressure after checking.
- Wait for complete drying. Thin material may finish in roughly one to three weeks. Finished pieces should be dry and papery without damp or soft areas. Leave thicker material longer if needed, changing damp paper rather than framing it early.
- Lift and arrange. Slide support beneath fragile pieces or use tweezers gently at a sturdy base. Plan the composition before attaching anything permanently.
Illinois 4-H's preservation guide describes pressing between plain paper with flat weight and checking the result; Missouri Extension's guide explains absorbent layers and replacement paper. The purpose is to remove moisture as well as flatten the flower.
A framed wedding bouquet keepsake you can make
Illustrative design: use three pressed rose petals as the focal point, a few small leaves around them and a short piece of the original ribbon below. Place everything loosely on acid-free backing first. Photograph two possible layouts, choose one, then use small amounts of a suitable archival adhesive according to its instructions. Test on a spare petal before attaching a treasured piece.
Choose a mount or spacer deep enough that the glass does not crush the material. Let adhesive dry fully before closing the frame. Write the wedding date and flower names on a separate label; leave breathing room around the arrangement rather than trying to fit every petal into one small frame.
Method 4: Professional wedding bouquet preservation
A specialist may offer pressing, supported drying, freeze-drying, a reconstructed bouquet, framed artwork or flowers set in resin. Ask what process the studio actually uses. “Preserved bouquet” describes an outcome, not one standardized treatment.
Professional help makes sense when a flower is difficult to handle, the original arrangement matters to you, you want a carefully finished display, or nobody can manage drying while you travel. Reserve before the wedding where possible, but ask about late availability rather than assuming an unbooked bouquet cannot be accepted.
Questions to settle before handing over your flowers
- Can you preserve these exact flowers? Send the florist's list and current photographs. Ask which may lose shape or color and which may be unsuitable.
- What will the finished piece contain? Confirm full bouquet versus selected blooms, size, layout approval, ribbon inclusion and whether spare material comes back.
- Are colors corrected or flowers substituted? Ask for unedited before-and-after examples using similar flowers, including white blooms. Agree whether replacements need permission.
- How must it arrive? Confirm the latest acceptable arrival, delivery address, receiving days and exact packing instructions before booking transport.
- What does the quote cover? Include drying, design, frame or resin item, shipping, tax, optional restoration and any deposit.
- What happens if flowers cannot be saved? Discuss partial designs, approval, refunds or credits under the studio's terms rather than assuming every bloom will be usable.
- When should the piece be ready? Ask about the current queue, design approval, drying and finishing time, plus care instructions and any warranty.
Obtain packaging instructions from your chosen studio. Do not combine one business's wet-stem shipping method with another's dry delivery instructions. Confirm whether ribbons should stay attached, how heads are protected, what carrier and service to use, and who receives the parcel. Photograph the packed bouquet, save tracking and check delivery; shipping an unannounced bouquet does not create a booking.
Completion is often much slower than the initial drying. For example, Wild Coast publishes a typical 3–5-month project turnaround. That is one studio's estimate, not an industry guarantee. Ask your own provider for a current written schedule before planning it as a gift for a particular date.
Where resin fits, and its limitations
Resin is a display option for flowers that have already been properly dried. It is not a way to rescue a fresh wet bouquet by pouring liquid around it. ArtResin's flower instructions require fully dried petals, gloves and a ventilated workspace. Handling requirements depend on the exact product and its safety information.
For an irreplaceable bouquet, use an experienced resin artist. Ask about bubbles, color changes, long-term yellowing and care in sunlight. A cured piece is difficult to change, so approve the arrangement before casting. “UV resistant” should not be read as a promise of no discoloration forever.
Which wedding flower preservation method should you choose?
If you are deciding how to preserve a bridal bouquet, choose the finished shape first. If you want to hold or display a natural dried wedding bouquet with its stems, air drying is the practical starting point. If you want a few rose heads with depth, choose silica. If you want a frame on a wall, press thin flowers or petals. If you want the work and finishing handled for you, choose a specialist with examples you like.
Then check the exceptions. A humid home with no dry ventilated area weakens the case for air drying. A thick flower weakens the case for pressing it whole. A honeymoon departure tomorrow makes a named helper or specialist more useful than buying equipment nobody will use.
You can divide the bouquet. For example, dry selected rose heads in silica, hang the baby's breath separately and press a few small leaves. That gives you more than one possible wedding bouquet keepsake without forcing every flower through the same treatment. Plan the display dimensions before deciding how many pieces to preserve.
How to preserve different wedding flowers
The choices below are starting points for common materials, not guarantees for every variety. The RHS, Missouri Extension and Illinois Extension references above support these method choices. If your bouquet contains orchids, ranunculus or another flower not listed here, ask the florist to identify the variety and a specialist to assess it; do not assume instructions for roses apply.
| Flower | Useful method | Main difficulty | What to expect |
|---|---|---|---|
| Roses | Silica for dimensional heads; separate petals for a flat keepsake. | Dense centers need attention. A whole thick rose is a difficult beginner pressing project. | Some depth can remain with silica; reds can darken and whites may become cream or tan. |
| Peonies | Silica for supported heads; individual hanging is another option for a dried look. | Large, layered heads need space and gentle handling. | A dried interpretation of the bloom, with possible shrinkage and color change. |
| Hydrangeas | Air-dry heads separately, or press selected small florets. | A whole cluster is bulky; do not squeeze it flat as one mass. | Papery clusters when hung; a flatter, more open design from selected florets. |
| Baby's breath | Air drying in loose sprays. | Fine branching stems can tangle and break when pulled apart after drying. | A light dried spray that becomes fragile; preserve its spacing during handling. |
| Dahlias | Silica for a supported head; pressing is more manageable with selected flatter material. | Flower form varies considerably; a large dense head needs more care than a simple bloom. | Dimensional or flat results according to the method, with possible darkening. |
| Statice | Air drying; selected small sprays can also be pressed. | Avoid packing several sprays tightly together. | A papery dried accent suited to a loose bouquet or smaller framed arrangement. |
| Pansies and violas | Pressing. | Petals must be positioned before weight is applied. | Flat flower shapes suitable for a frame; no dimensional head remains. |
| Small, thin leaves | Pressing, after checking the foliage is suitable. | Thick fleshy leaves dry differently; the word 'foliage' does not describe one material. | Flat leaf outlines with possible color change. Ask about specialist treatment if you want flexible greenery. |
If the wedding is still ahead, practice with spare stems of the same flowers. If it has already happened, do not postpone all preservation to run a long experiment. Keep a few sound pieces aside for a different suitable method and make a timely decision about the rest.
How to display and store preserved wedding flowers
Use a flat frame for pressed pieces and a deep case for dimensional blooms. A wedding bouquet shadow box needs room for the tallest flower, its attachment and clearance from the glazing. Measure that depth before buying the frame. Do not push the glass against petals to make an arrangement fit.
A dried bouquet can stand in a dry vase, but exposed flowers collect dust and are easy to knock. Choose a stable position away from doors, frequently used shelves and pets. Keep all dried flowers away from candles, fireplaces and other heat sources.
Pick an interior wall or shelf away from direct sunlight and damp rooms. A bathroom or kitchen with repeated moisture is a poor display location. Protective glazing helps with handling and dust, but it does not make a damp flower safe to enclose or stop every future color change.
For storage, place fully dry pieces in a rigid box with gentle support so the heads do not bear the weight of other objects. Label the box and keep it in a dry, stable indoor location. Lift an arrangement by its base or frame, not by its petals. Remove loose dust with a very soft brush only where the material can tolerate it; do not mist or wipe dried flowers with a wet cloth.
Keep the original bouquet photograph and a picture of the finished display. If you want guest photographs of the flowers in use, the guide to collecting photos after the wedding includes a practical follow-up plan. Photographs preserve details that no drying method can promise to keep unchanged.
Common bouquet preservation mistakes and how to avoid them
- Starting after deterioration: drying cannot undo bruises or rot. Assign the handoff and prepare supplies before the bouquet is forgotten in a vase.
- Enclosing damp material: visible surface water and an unfinished center are different problems. Check both before framing, storing or casting.
- Using one method for everything: a thin leaf and a dense flower head need different treatment. Separate the bouquet by material and intended display.
- Handling petals repeatedly: every inspection is another chance to tear them. Label batches, plan checks and support flowers from below.
- Confusing airflow with airtight drying: hanging flowers need ventilation; silica needs a sealed container so it can work on the flowers rather than room moisture. Follow the correct setup for each method.
- Drying or displaying in strong sun: choose low light while drying and an indoor display out of direct sunlight afterward.
- Using a shallow frame or damp storage space: measure before arranging and choose a dry location. A pretty box does not compensate for crushing or humidity.
- Expecting the fresh appearance forever: preserve a photograph, allow for color change and ask professionals whether their samples use correction or replacement flowers.
Complete wedding bouquet preservation checklist
Use this checklist to hand the job to a helper or track your own batches. The downloadable and printable version includes space for the florist, method, delivery plan, check dates and observations. Keep the manufacturer's instructions beside it when using silica.
Immediately after the wedding
- Give the bouquet to a named person who knows the preservation plan.
- Photograph its front, side and ribbon before taking anything apart.
- Keep it away from direct sun, heaters and a hot parked car.
- For a hand-tied bouquet, place the cut stems in clean water with blooms and ribbon above it.
- Ask the florist how to care for a wired or foam-held arrangement; do not dismantle it blindly.
- Contact the chosen specialist before shipping, or prepare the DIY supplies while flowers are still sound.
Before preservation
- Identify the flowers and decide which need to stay dimensional and which can be pressed.
- Separate damaged, rotting or moldy material; do not include it in a keepsake.
- Remove pins carefully and store the ribbon, charms and other keepsakes separately.
- Let visible surface moisture dry before placing flowers into a press or drying agent.
- Choose a small selection of healthy blooms if the full bouquet is too large to handle well.
- Read the product instructions and prepare enough space, absorbent paper or flower-drying silica.
- Label each batch with flower type, method, start date and first check date.
During preservation
- For air drying, keep small bunches separated with airflow and low light.
- For silica, support petals carefully, keep blooms apart and close the airtight lid.
- For pressing, keep flowers in a single layer and use flat, even pressure.
- Check absorbent paper and replace it when damp, handling flowers as little as possible.
- Check for mold or deterioration and remove affected material from the batch.
- Use the method's drying guidance; check thick parts before assuming the flowers are finished.
- Record changes and wait if the flower is still soft or damp rather than sealing it early.
After preservation
- Lift by the stem or support the flower from below; avoid pinching petals.
- Remove loose silica gently with a soft brush; do not rinse dried blooms.
- Arrange the display before attaching flowers, leaving room for fragile edges.
- Use a frame or shadow box with enough depth to avoid crushing the flowers.
- Keep the display away from sunlight, humidity, heat and open flames.
- Store unused dry flowers in a rigid protective box without stacking heavy objects on them.
- Save a photograph of the finished keepsake and follow any specialist care instructions.
Make the ask easy
Save the flowers. Keep the photos of them, too.
Your bouquet in your hands, on the dinner table, or beside the people who helped make it: guests may have those pictures on their phones. Give them one WeddingPhoto App album to add photos and videos from their browser, then download your collection before its storage window ends.
Learn more about WeddingPhoto App as a wedding photo sharing app for guests.
Frequently asked questions
Can you preserve an entire wedding bouquet?
You can keep a bouquet-shaped arrangement, but drying its flowers in smaller groups often makes the process more manageable. Air-dry suitable stems and reassemble them, or ask a specialist about a dimensional display. Silica drying and pressing normally require separating the flowers; pressing cannot retain the original three-dimensional bouquet.
How long after the wedding can you preserve flowers?
Start while the flowers are still in good condition, ideally by making the handoff or beginning preparation immediately after the event. There is no reliable deadline for every bouquet. Heat, time without water and the types of flowers matter. If using a service, obtain its acceptance and delivery instructions before sending anything.
Can you preserve flowers that have already wilted?
Sometimes you can keep sound petals or individual blooms, but drying does not reverse bruising, browning or collapsed shapes. Separate any healthy material and ask a specialist to assess photographs if you are unsure. Exclude rotting or moldy flowers rather than enclosing them in a frame or resin.
What is the easiest bouquet preservation method?
Air drying needs the least equipment and suits a natural dried look. It still needs suitable flowers, space between bunches and a dry, ventilated location. For a few thin flowers or petals and a flat keepsake, pressing may be the easier practical choice.
Can wedding flowers be preserved without losing color?
No method guarantees an exact color match. Silica can retain shape and color better than unsupported drying for some flowers, but petals still change. White flowers may become cream or tan, and dark shades can deepen. Ask a specialist whether displayed examples include color correction.
How long do preserved wedding bouquets last?
They can last for years when properly dried and protected, but there is no fixed lifespan. Flower type, technique, light, humidity and handling affect their condition. Expect gradual color changes and increasing fragility; preserve a photograph as well as the physical flowers.
Can you preserve flowers in resin?
Fully dried flowers can be enclosed in a suitable resin display. Fresh flowers should not simply be submerged in resin because trapped moisture can cause deterioration. Resin work needs product-specific handling, ventilation and protective equipment, and yellowing remains a long-term limitation. Use an experienced specialist for an irreplaceable bouquet.
Should you preserve your bouquet yourself or use a professional?
Choose DIY if you can start promptly, have a suitable drying space and accept a variable result. Choose a professional if the flowers are difficult, you want a carefully finished display or you cannot manage the handoff and drying yourself. Review examples using the same flowers and confirm what happens if some blooms cannot be saved.
Our product details: features and limits · current plans. Corrections: support@folded.cloud.